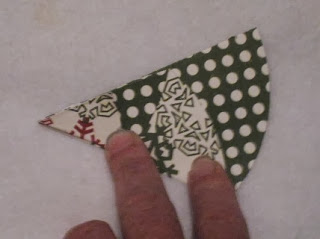
Next I used my Scor Pal to measure and draw a straight line at 1 1/4" and I folded it so the back side is on top. Next step take small top piece that is the back of your paper and make a triangle. Last bring the front paper around.
This is what the tree should look like.
So the white paper was my top and you see the small triangle, next is the green & white polka dot,which is the back, next he white (top) and last polka dot (back). So you have 3 folds. I kept them down with brads, after punching a hole in the tree where I wanted the brad to go (looks like ornaments).
This is what the card looks like and I will tell you how I assembled it.
I took the Christmas Tree and centered it on embossed piece of cardstock. I added a brown trunk and made 2 holes to add some twine and tied a bow.I also added a blingy star at the top with the sentiment Merry Christmas. I mounted it on 2 separate Christmas line papers, then put on my base. I think this was my favorite Christmas Card I made this season. I know I could not have made the circle without the Circle Cutter, since punches are not that big.
I hope you enjoyed this card as much as I did.


I love your tree and your card is pretty!
ReplyDeleteMerry Christmas!
oh, excellent idea!! and what a great card! i love all the layers you've made!! the embossing is perfect with this card and the papers you've used a superb!
ReplyDeletegreat job!